Week 2-Embedded Programming
Assignments of the Week
- Microcontroller Study:
- Review and analyze microcontroller datasheet
- Program Development:
- Write a microcontroller program that: Implements device interaction (local I/O) Establishes communication (wired/wireless) Includes simulation testing
- Extra Credit Options:
- Hardware Implementation: Test program on actual development board
- Development Exploration: Experiment with multiple programming languages Try different development environments
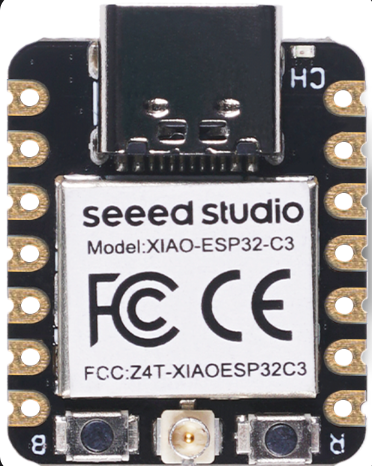
1.Getting Started with Seeed Studio XIAO ESP32C3
 Reference: https://wiki.seeedstudio.com/XIAO_ESP32C3_Getting_Started/
1.1 Features
Seeed Studio XIAO ESP32C3 is an IoT mini development board based on the Espressif ESP32-C3 WiFi/Bluetooth dual-mode chip, featuring a 32-bit RISC-V CPU that delivers powerful computing performance with its efficient architecture.the key features & layouts is listed below: 
- Item: Seeed Studio XIAO ESP32C3
- Powerful CPU: ESP32-C3, 32bit RISC-V singlecore processor that operates at up to 160 MHz
- Complete WiFi subsystem: Complies with IEEE 802.11b/g/n protocol and supports Station mode, SoftAP mode, SoftAP + Station mode, and promiscuous mode
- Bluetooth LE subsystem: Supports features of Bluetooth 5 and Bluetooth mesh
- Ultra-Low Power: Deep sleep power consumption is about 43μA
- Better RF performance: External RF antenna included
- Battery charging chip: Supports lithium battery charge and discharge management
- Rich on-chip resources: 400KB of SRAM, and 4MB of on-board flash memory
- Ultra small size: As small as a thumb(21x17.8mm) XIAO series classic form-factor for wearable devices and small projects
- Reliable security features: Cryptographic hardware accelerators that support AES-128/256, Hash, RSA, HMAC, digital signature and secure boot
- Rich interfaces: 1xI2C, 1xSPI, 2xUART, 11xGPIO(PWM), 4xADC, 1xJTAG bonding pad interface
- Single-sided components, surface mounting design
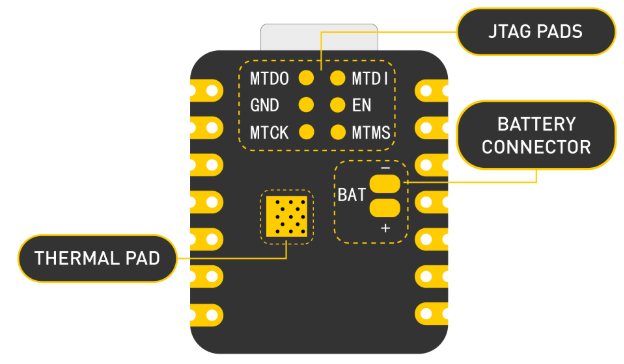
1.2 Component overview

1.3 Power Pins
- 5V - This is 5v out from the USB port. You can also use this as a voltage input but you must have some sort of diode (schottky, signal, power) between your external power source and this pin with anode to battery, cathode to 5V pin.
- 3V3 - This is the regulated output from the onboard regulator. You can draw 700mA
- GND - Power/data/signal ground
1.4 Strapping Pins
According to the chip manual of ESP32C3, GPIO2, GPIO8 and GPIO9 in the chip are Strapping Pins, the high and low level configurations of these pins may allow the chip to enter into different Boot modes, please pay attention to this point when you use these pins, otherwise it may prevent your XIAO from uploading or executing the program all the time. 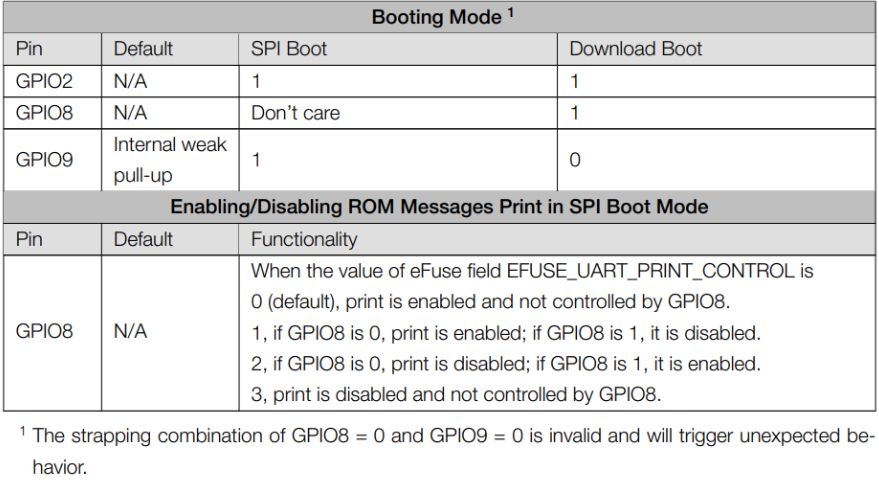
2.Try Seeed Studio XIAO ESP32C3
2.1 Software
We can download Arduino IDE from here according to your PC's version and then install by yourself.  Board and port initialization tutorials are available here in "Software setup"
2.2 Design and Simulation
wokwi is a great website where you can design and test your circuit online. 
2.3 Servo Control with Ultrasonic Sensor Input
In this exercise, I have tried to use ultrasonic sensor as input to trigger a servo motor to rotate. This interaction happens when an object enters or leaves the sensor's detection range. 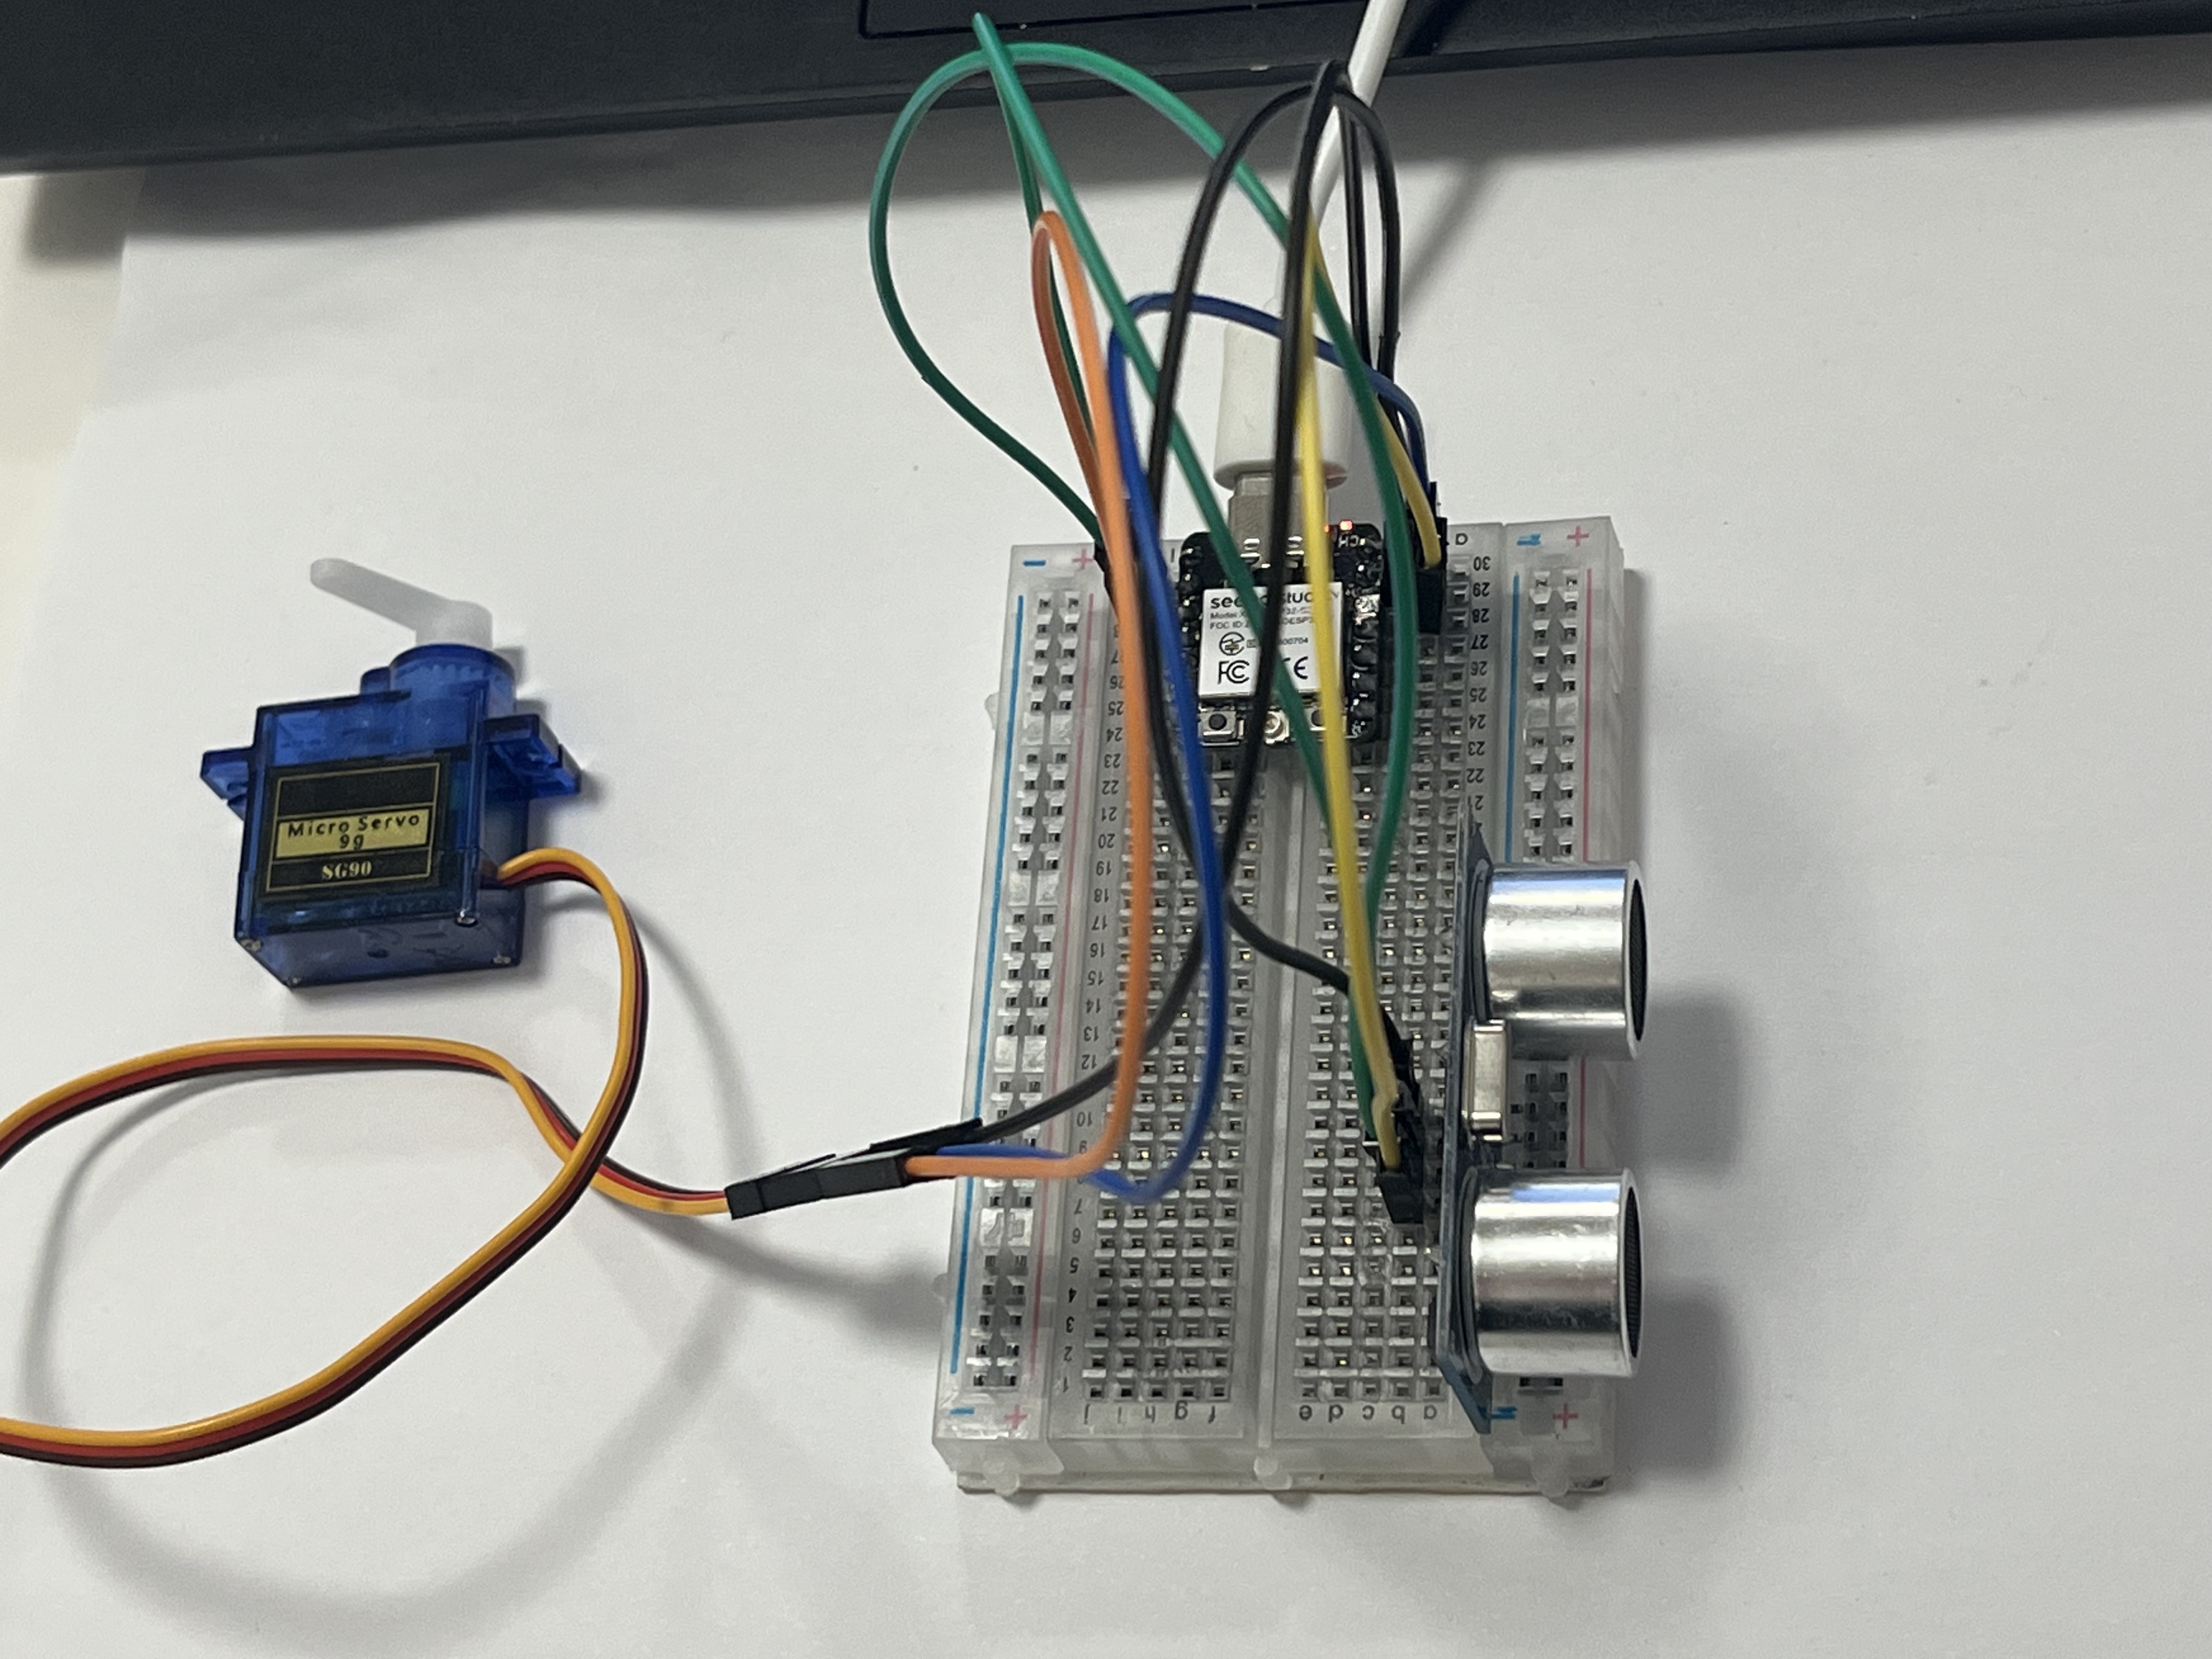 I have first designed the circuit online then write the code and deployed on it.
 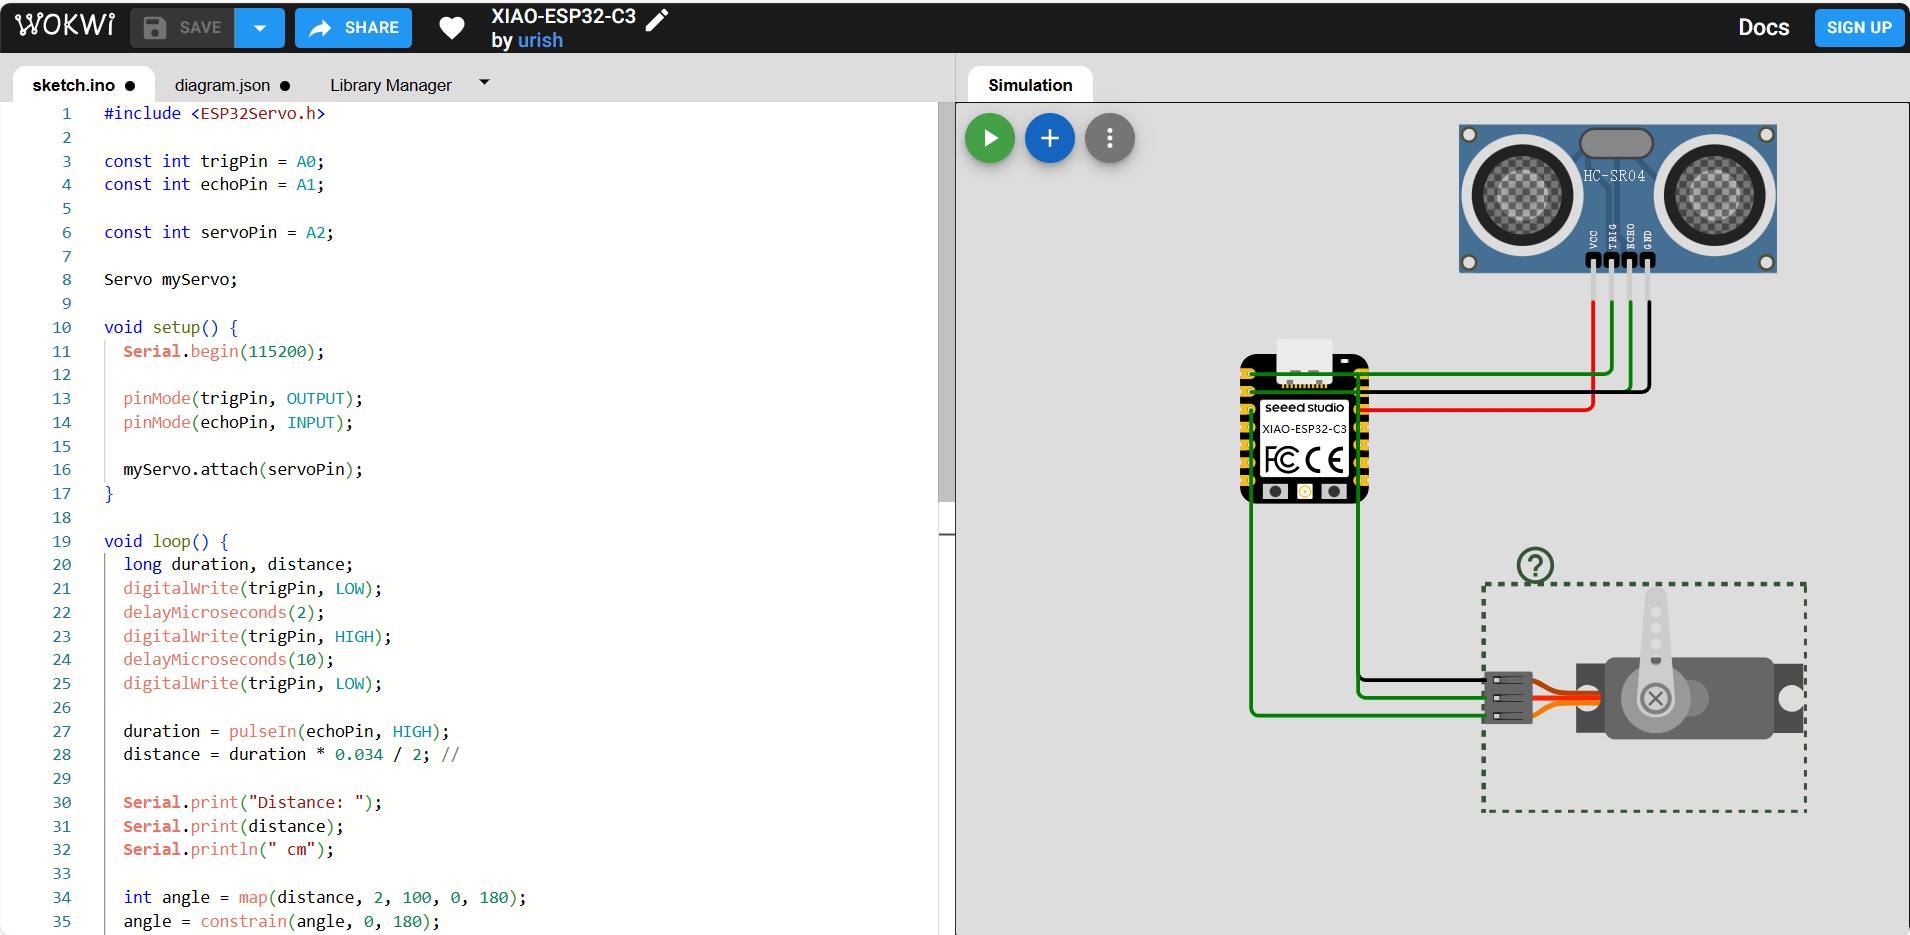 The code applied as below:
#include <ESP32Servo.h>
const int trigPin = A0;
const int echoPin = A1;
const int servoPin = A2;
Servo myServo;
void setup() {
Serial.begin(115200);
pinMode(trigPin, OUTPUT);
pinMode(echoPin, INPUT);
myServo.attach(servoPin);
}
void loop() {
long duration, distance;
digitalWrite(trigPin, LOW);
delayMicroseconds(2);
digitalWrite(trigPin, HIGH);
delayMicroseconds(10);
digitalWrite(trigPin, LOW);
duration = pulseIn(echoPin, HIGH);
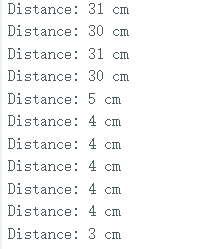
distance = duration * 0.034 / 2; //
Serial.print("Distance: ");
Serial.print(distance);
Serial.println(" cm");
int angle = map(distance, 2, 100, 0, 180);
angle = constrain(angle, 0, 180);
myServo.write(angle);
delay(100);
}Final result is that when an obstacle is approaching near to the Ultrasonic Sensor, the servo motor will rotate from 0 to 180 degrees clockwise depending on the distance between the obstacle and the sensor (when the distance is 2cm, the servo will rotate to 0 degrees, when the distance is 100cm, the servo will rotate to 180 degrees).