Final Project — OAK Camera Management + Custom Object Detection
Goal: Use an OAK camera to build a reproducible pipeline: collect and manage data, train a custom YOLO detector, and finally output text-only detection results (target format):
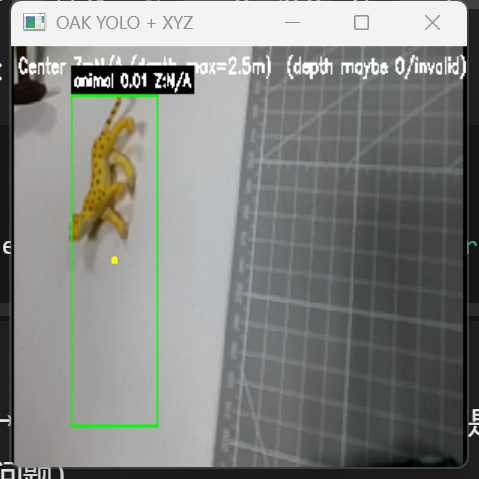
animal 0.87 x1=143 y1=92 x2=388 y2=401Current Status (Important): As of now, the trained model does not produce stable detections (often no boxes / empty output / unstable results).
This page documents what I have implemented, the exact code used, and a clear debugging roadmap to reach successful detection.
1. Project Overview
1.1 Work Completed
- OAK camera integration & management (DepthAI): build an RGB stream and save frames as a dataset
- Dataset preparation: organize images/labels in YOLO format
- Model training (Ultralytics YOLO): train and generate
best.pt / last.pt - Inference validation (current bottleneck): run YOLO on OAK frames and print text outputs, but detections are not stable yet
1.2 Target Output (Text-only)
This is the expected final format (not consistently achieved yet; shown as the final goal):
animal 0.87 x1=143 y1=92 x2=388 y2=401
Field meanings:
animal: predicted class name0.87: confidence score (0~1, higher = more confident)x1,y1,x2,y2: bounding box corners in pixels (top-left and bottom-right)
2. Environment & Dependencies (Reproducible in VS Code)
2.1 Hardware
- OAK model: [TODO: e.g., OAK-D Lite / OAK-1 / OAK-D]
- Host: Windows / Linux / macOS
2.2 Software Dependencies
Run in VS Code terminal:
python -m venv .venv
# Windows:
.venv\Scripts\activate
# macOS/Linux:
# source .venv/bin/activate

pip install depthai opencv-python ultralytics
3. OAK Camera Integration & Data Capture (DepthAI)
3.1 Device Overview

3.2 Capture Logic
- Start OAK RGB preview
- Press S to save frames into
dataset/raw_images/ - Press Q to quit
3.3 Capture Code (VS Code-style tabs)
from pathlib import Path
import cv2
import depthai as dai

SAVE_DIR = Path("dataset/raw_images")
SAVE_DIR.mkdir(parents=True, exist_ok=True)

def main():
    pipeline = dai.Pipeline()

    cam = pipeline.create(dai.node.ColorCamera)
    cam.setPreviewSize(640, 640)
    cam.setInterleaved(False)
    cam.setColorOrder(dai.ColorCameraProperties.ColorOrder.BGR)

    xout = pipeline.create(dai.node.XLinkOut)
    xout.setStreamName("rgb")
    cam.preview.link(xout.input)

    with dai.Device(pipeline) as device:
        q = device.getOutputQueue("rgb", maxSize=4, blocking=False)
        idx = 0

        while True:
            frame = q.get().getCvFrame()
            cv2.imshow("OAK RGB Preview (S=Save, Q=Quit)", frame)

            key = cv2.waitKey(1) & 0xFF
            if key in (ord("q"), ord("Q")):
                break

            if key in (ord("s"), ord("S")):
                filename = SAVE_DIR / f"img_{idx:06d}.jpg"
                cv2.imwrite(str(filename), frame)
                print(f"[Saved] {filename}")
                idx += 1

    cv2.destroyAllWindows()

if __name__ == "__main__":
    main()
4.Dataset Labeling (YOLO Format)
4.1 Labeling Tools
Use Labeling to annotate the pictures taken by the oak camera, in order to prepare for the subsequent training of the oak camera. 
4.2 Dataset Structure
After labeling + splitting: dataset/ images/ train/ val/ labels/ train/ val/ data.yaml
4.3 YOLO Label File Format
Each image has a .txt label file with lines: class x_center y_center width height
All coords are normalized to 0~1.
Example (labels/train/img_000001.txt): 0 0.413 0.522 0.318 0.402
5. Model Training
5.1 Training Command
在 VS Code 终端运行
yolo detect train data=data.yaml model=yolov8n.pt imgsz=640 epochs=100 batch=16 patience=50
5.2 Training Script (save as code/02_train_yolo.py)
from ultralytics import YOLO

def main():
    model = YOLO("yolov8n.pt")  # [TODO: choose your base model]
    model.train(
        data="data.yaml",
        imgsz=640,
        epochs=100,
        batch=16,
        patience=50,
        device=0,        # if no GPU -> "cpu"
        project="runs",
        name="final_project_oak"
    )

if __name__ == "__main__":
    main()
6. Real-time Inference (Text-only Output) — Not Stable Yet