Appearance
Processing
1. The structure of Processing
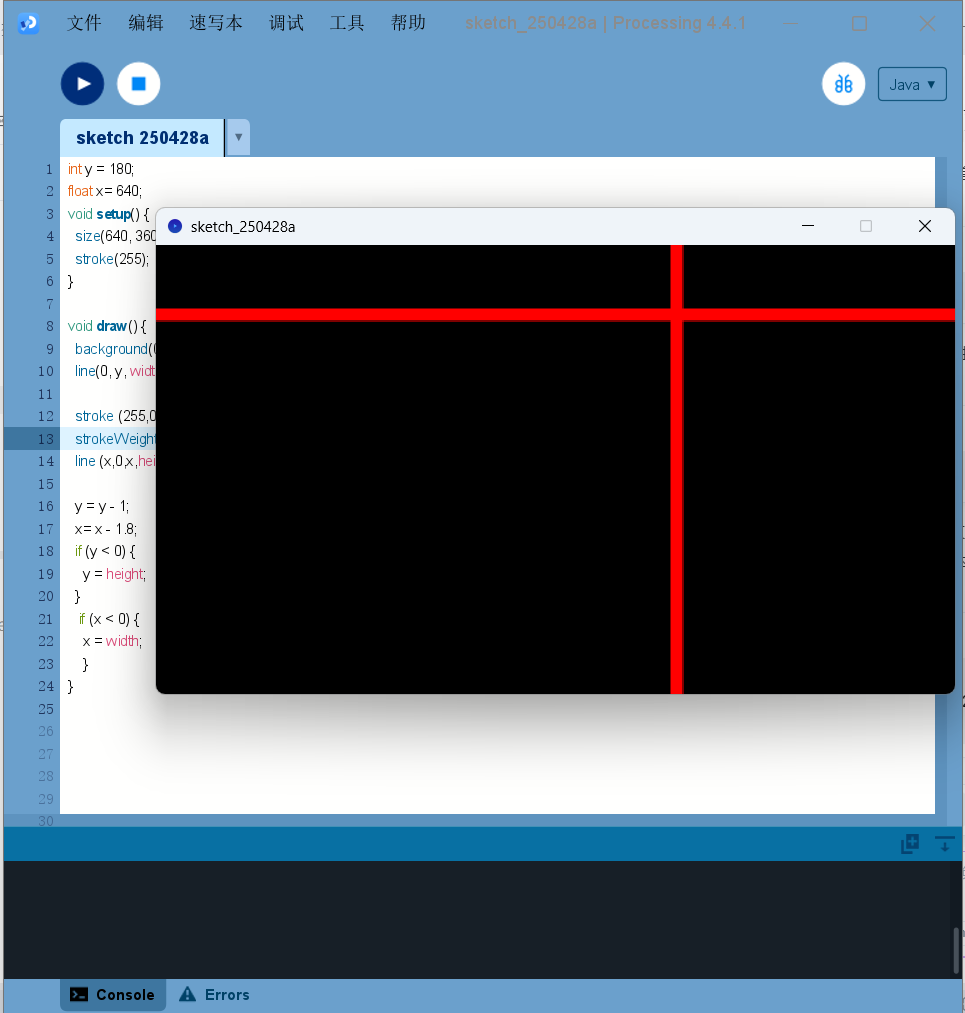
(1) Case 1
bash
int y = 180;
int x = 640;  // 红线的初始x坐标
void setup() {
  size(640, 360);  // Size must be the first statement
  stroke(255);  // Set line drawing color to white
}

void draw() {
  background(0);  // Clear the screen with a black background
  line(0, y, width, y);  // 白色横线

  // 绘制红色竖线
  stroke(255, 0, 0);  // 设置红色
  strokeWeight(3);  // 设置线条宽度为3
  line(x, 0, x, height);  // 红色竖线

  // 更新y和x的坐标,使其向左上角移动
  y = y - 1;
  x = x - 1;

  if (y < 0) {
    y = height;
  }
  if (x < 0) {
    x = width;  // 让竖线从右侧重新出现
  }
}
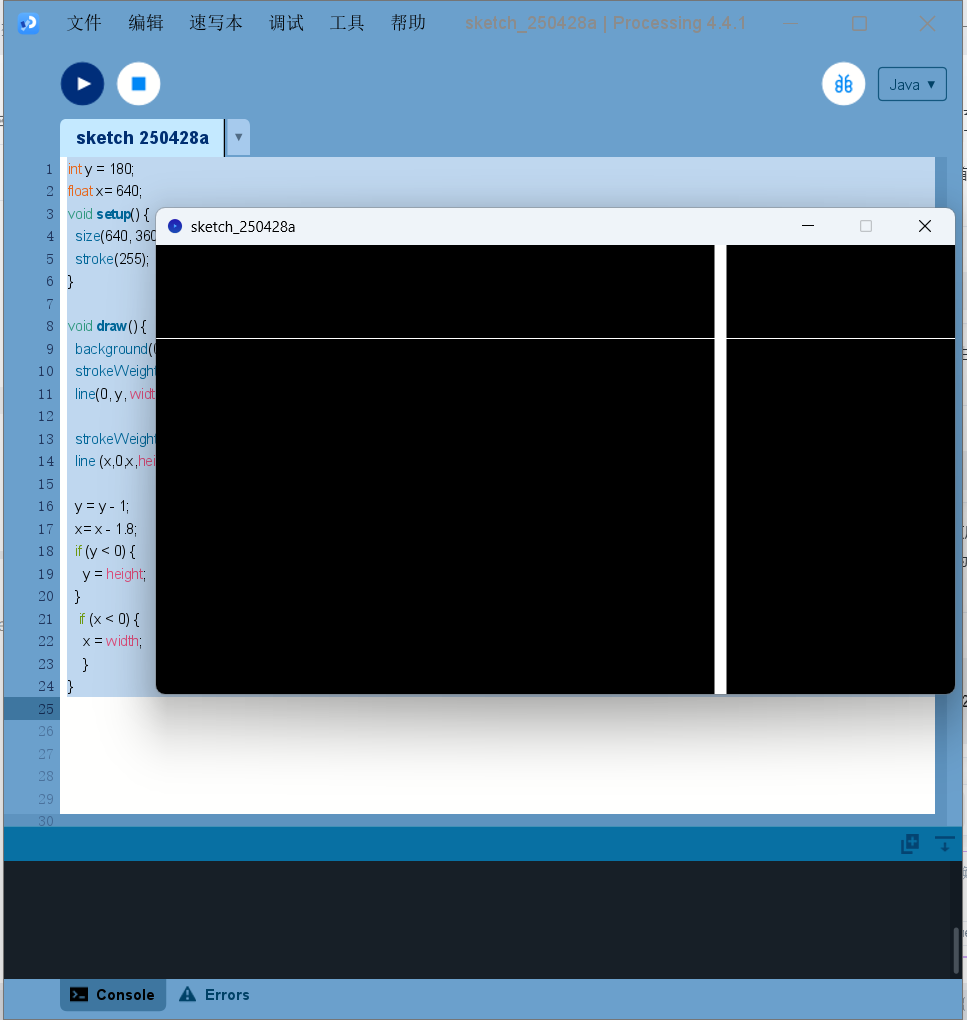
(2) Case 2 (Stroke weight)
bash
int y = 180;
float x= 640;
void setup() {
  size(640, 360);  // Size must be the first statement
  stroke(255);  // Set line drawing color to white
}

void draw() {
  background(0);  // Clear the screen with a black background
  strokeWeight (1);
  line(0, y, width, y);

  strokeWeight (10);
  line (x,0,x,height);

  y = y - 1;
  x= x - 1.8;
  if (y < 0) {
    y = height;
  }
   if (x < 0) {
    x = width;
    }
}
Code reference about processing can find at https://processing.org/reference/#input
2. LED Setting
To use the LED pattern, we weld the LED to the wires for the connection of Ardunio.

LED code
bash
#include "FastLED.h"

#define NUM_LEDS 18            // LED灯珠数量
#define LED_DT 8               // 信号引脚
#define LED_TYPE WS2812B       // LED灯带型号
#define COLOR_ORDER GRB

int startIndex = 0;  // 起始偏移量

uint8_t max_bright = 50;       // LED亮度,范围0~255
CRGB leds[NUM_LEDS];           // 建立灯带leds

// fill_solid
//CRGB myColor = CRGB::YellowGreen;   // 颜色
// CRGB myColor(50,0,50);   // 红绿蓝数值

// fill_rainbow 参数 (彩虹渐变)
uint8_t beginHue = 0;         // 起始色调
uint8_t deltaHue = 10;        // 相邻灯珠之间的色调差

// fill_gradient_RGB 参数 (RGB渐变)
int gradientStart = 0;        // 渐变起始LED编号
CRGB startColor = CRGB::Red;  // 渐变起始颜色
int gradientEnd = 17;    // 渐变结束LED编号
CRGB endColor = CRGB::Blue;   // 渐变结束颜色

// fill_palette 参数 (色板填充)
uint8_t paletteStartIndex = 0;      // 色板起始索引
uint8_t paletteColorDiff = 10;        // 相邻灯珠色板索引差
CRGBPalette16 myPalette = HeatColors_p;  // 使用预设色板
  /*
    8种预设色板
    CloudColors_p           //云
    LavaColors_p            //熔岩
    OceanColors_p           //海洋
    ForestColors_p          //森林
    RainbowColors_p         //彩虹
    RainbowStripeColors_p
    PartyColors_p           //派对
    HeatColors_p            //热
  */
uint8_t paletteBrightness = 128;    // 亮度
TBlendType paletteBlending = LINEARBLEND; // 线性变化  NOBLEND:颜色突变

// fill_gradient 参数 (HSV)
int hsvGradientStart = 0;           // HSV渐变起始LED编号
CHSV hsvStartColor = CHSV(50, 255, 255); // HSV起始色
int hsvGradientEnd = 17;      // HSV渐变结束LED编号
CHSV hsvEndColor = CHSV(150, 255, 255); // HSV结束色
TGradientDirectionCode gradientDirection = SHORTEST_HUES; // 颜色过渡方向(SHORTEST_HUES 或 LONGEST_HUES)

// ColorFromPalette 参数
uint8_t paletteIndex = 15;       // 色板中要取的颜色索引
uint8_t colorBrightness = 128;  // 取色时的亮度
TBlendType colorBlendType = LINEARBLEND;  // 取色时的混合模式

void setup() {
  LEDS.addLeds<LED_TYPE, LED_DT, COLOR_ORDER>(leds, NUM_LEDS);
  FastLED.setBrightness(max_bright);
  FastLED.clear();
}

void loop () {
  // 将LED光带设置为同一颜色
  //fill_solid(leds, NUM_LEDS, myColor);  // 填充蓝色

  // 彩虹渐变
  //fill_rainbow(leds, NUM_LEDS, beginHue, deltaHue);
  // leds:LED对象
  // NUM_LEDS:LED数量
  // beginHue:彩虹色的起始色调值,最大为255
  // deltaHue:相邻灯珠的色调差,最大为255

  // RGB渐变
  fill_gradient_RGB(leds, gradientStart, startColor, gradientEnd, endColor);
  // leds:LED对象
  // gradientStart:起始灯珠编号
  // startColor:开始的颜色
  // gradientEnd:最后一个灯珠的编号
  // endColor:结束的颜色

  // 使用色板填充
  // fill_palette(leds, NUM_LEDS, paletteStartIndex, paletteColorDiff, myPalette, paletteBrightness, paletteBlending);
  // NUM_LEDS:灯珠数量
  // paletteStartIndex:第一个灯珠的色板色彩序号
  // paletteColorDiff:相邻两个灯珠色差
  // myPalette:预设色板
  // paletteBrightness:亮度(0~255)
  // LINEARBLEND:线性过渡

  // HSV渐变
  // fill_gradient(leds, 0, hsvStartColor, 18, hsvEndColor, gradientDirection);
  // fill_gradient(leds, 0, CHSV(50, 255,255) , 29, CHSV(150,255,255), LONGEST_HUES);
  // hsvStartColor:起始色彩,HSV格式
  // hsvEndColor:结束色彩
  // SHORTEST_HUES:短色过渡方式,两个颜色值之间最短的颜色过渡
  // LONGEST_HUES:长色过渡方式,两个颜色值之间最长的颜色过渡
  //注意:使用SHORTEST_HUES和LONGEST_HUES的时候必须采用CHVS方式填色

  // 从色板单独取颜色
  // CRGB myColor = ColorFromPalette(RainbowColors_p, paletteIndex, colorBrightness, colorBlendType);
  // fill_solid(leds, NUM_LEDS, myColor);
  // RainbowColors_p:使用色板
  // paletteIndex:颜色序号
  // colorBrightness:亮度
  // LINEARBLEND:线性渐变


  // 流水灯
  //  for (int i = 0; i < NUM_LEDS; i++) {
  //   leds[i] = CRGB::Red;    // 点亮为红色
  //   FastLED.show();
  //   delay(100);             // 每个灯之间的延时,100ms可以调快或慢
  //   leds[i] = CRGB::Black;  // 熄灭当前灯
  // }

   // 每次整体移动一个颜色
  // for (int i = 0; i < NUM_LEDS; i++) {
  //   leds[(i + startIndex) % NUM_LEDS] = CHSV((i * 10) % 255, 255, 255);
  // }

  // FastLED.show();
  // delay(100); // 控制流动速度(小一点更快)

  // // 清除当前灯状态,为下一次刷新做准备
  // fill_solid(leds, NUM_LEDS, CRGB::Black);

  // // 移动起始点,制造流动感
  // startIndex = (startIndex + 1) % NUM_LEDS;


  FastLED.show();
  delay(25);
}
In this code, we use different led pattern to show the effect.
(1)Fill solid 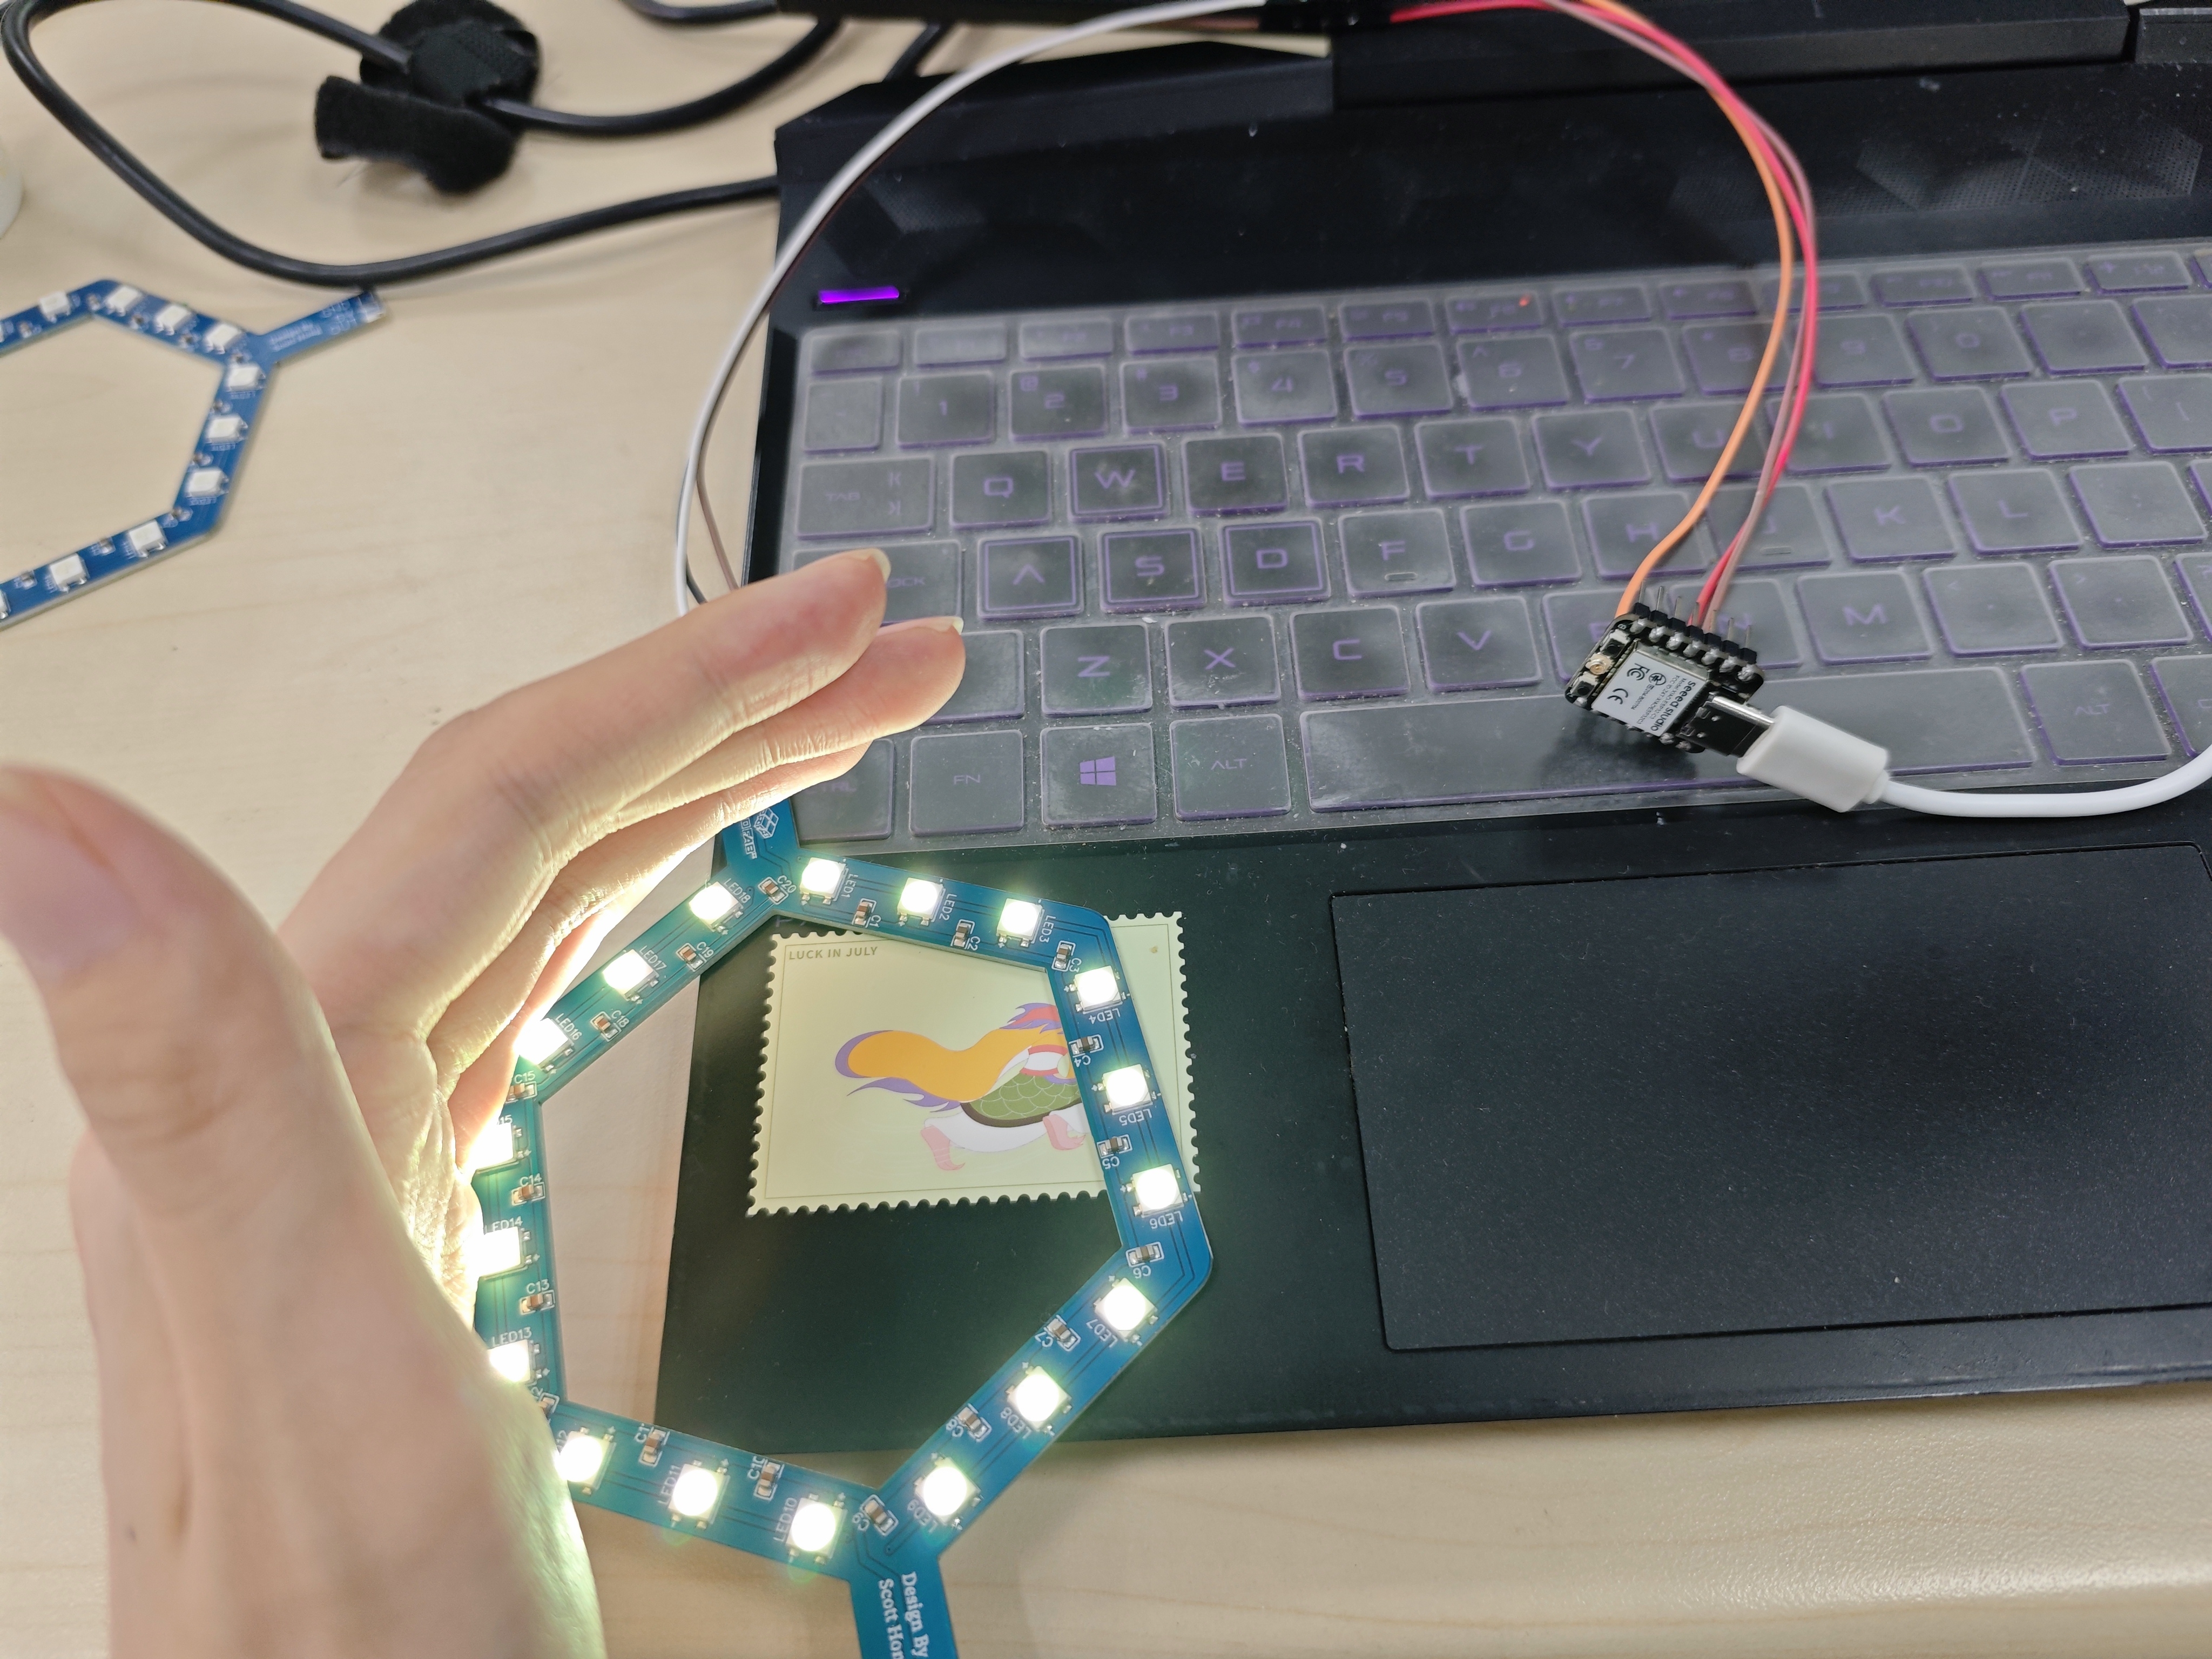
(2) Rainbow Color 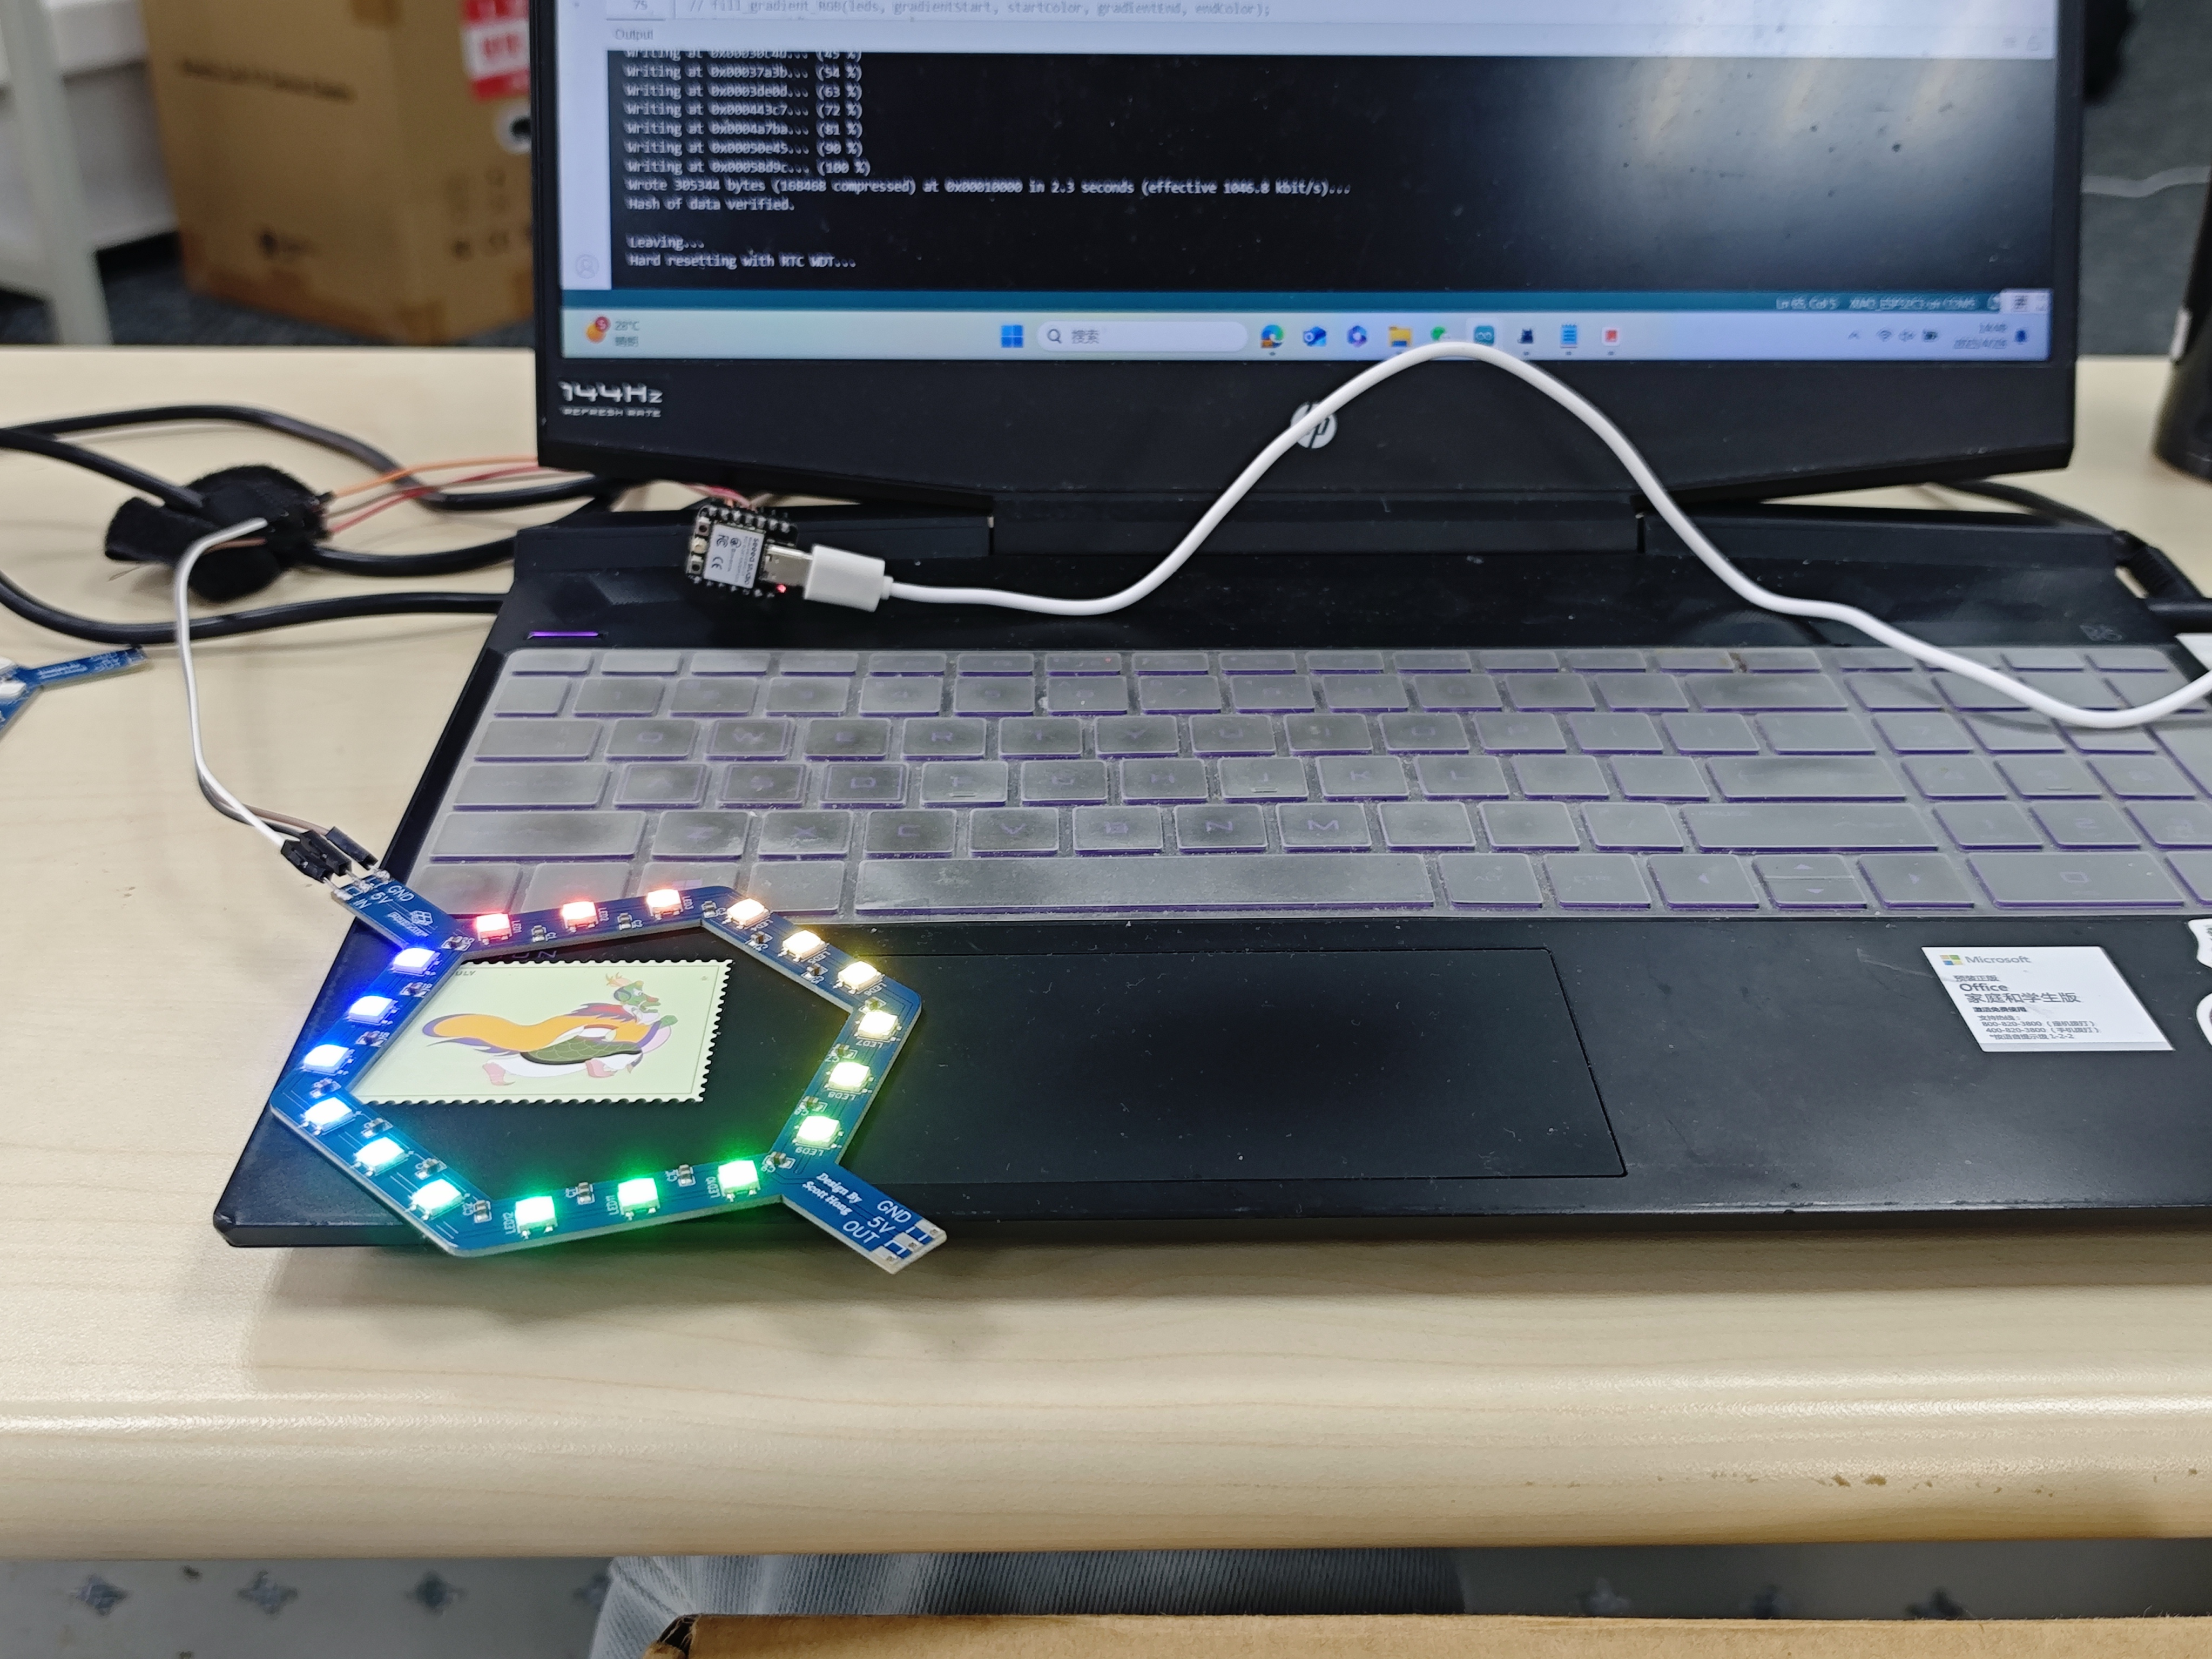
(3) RGB Gradient 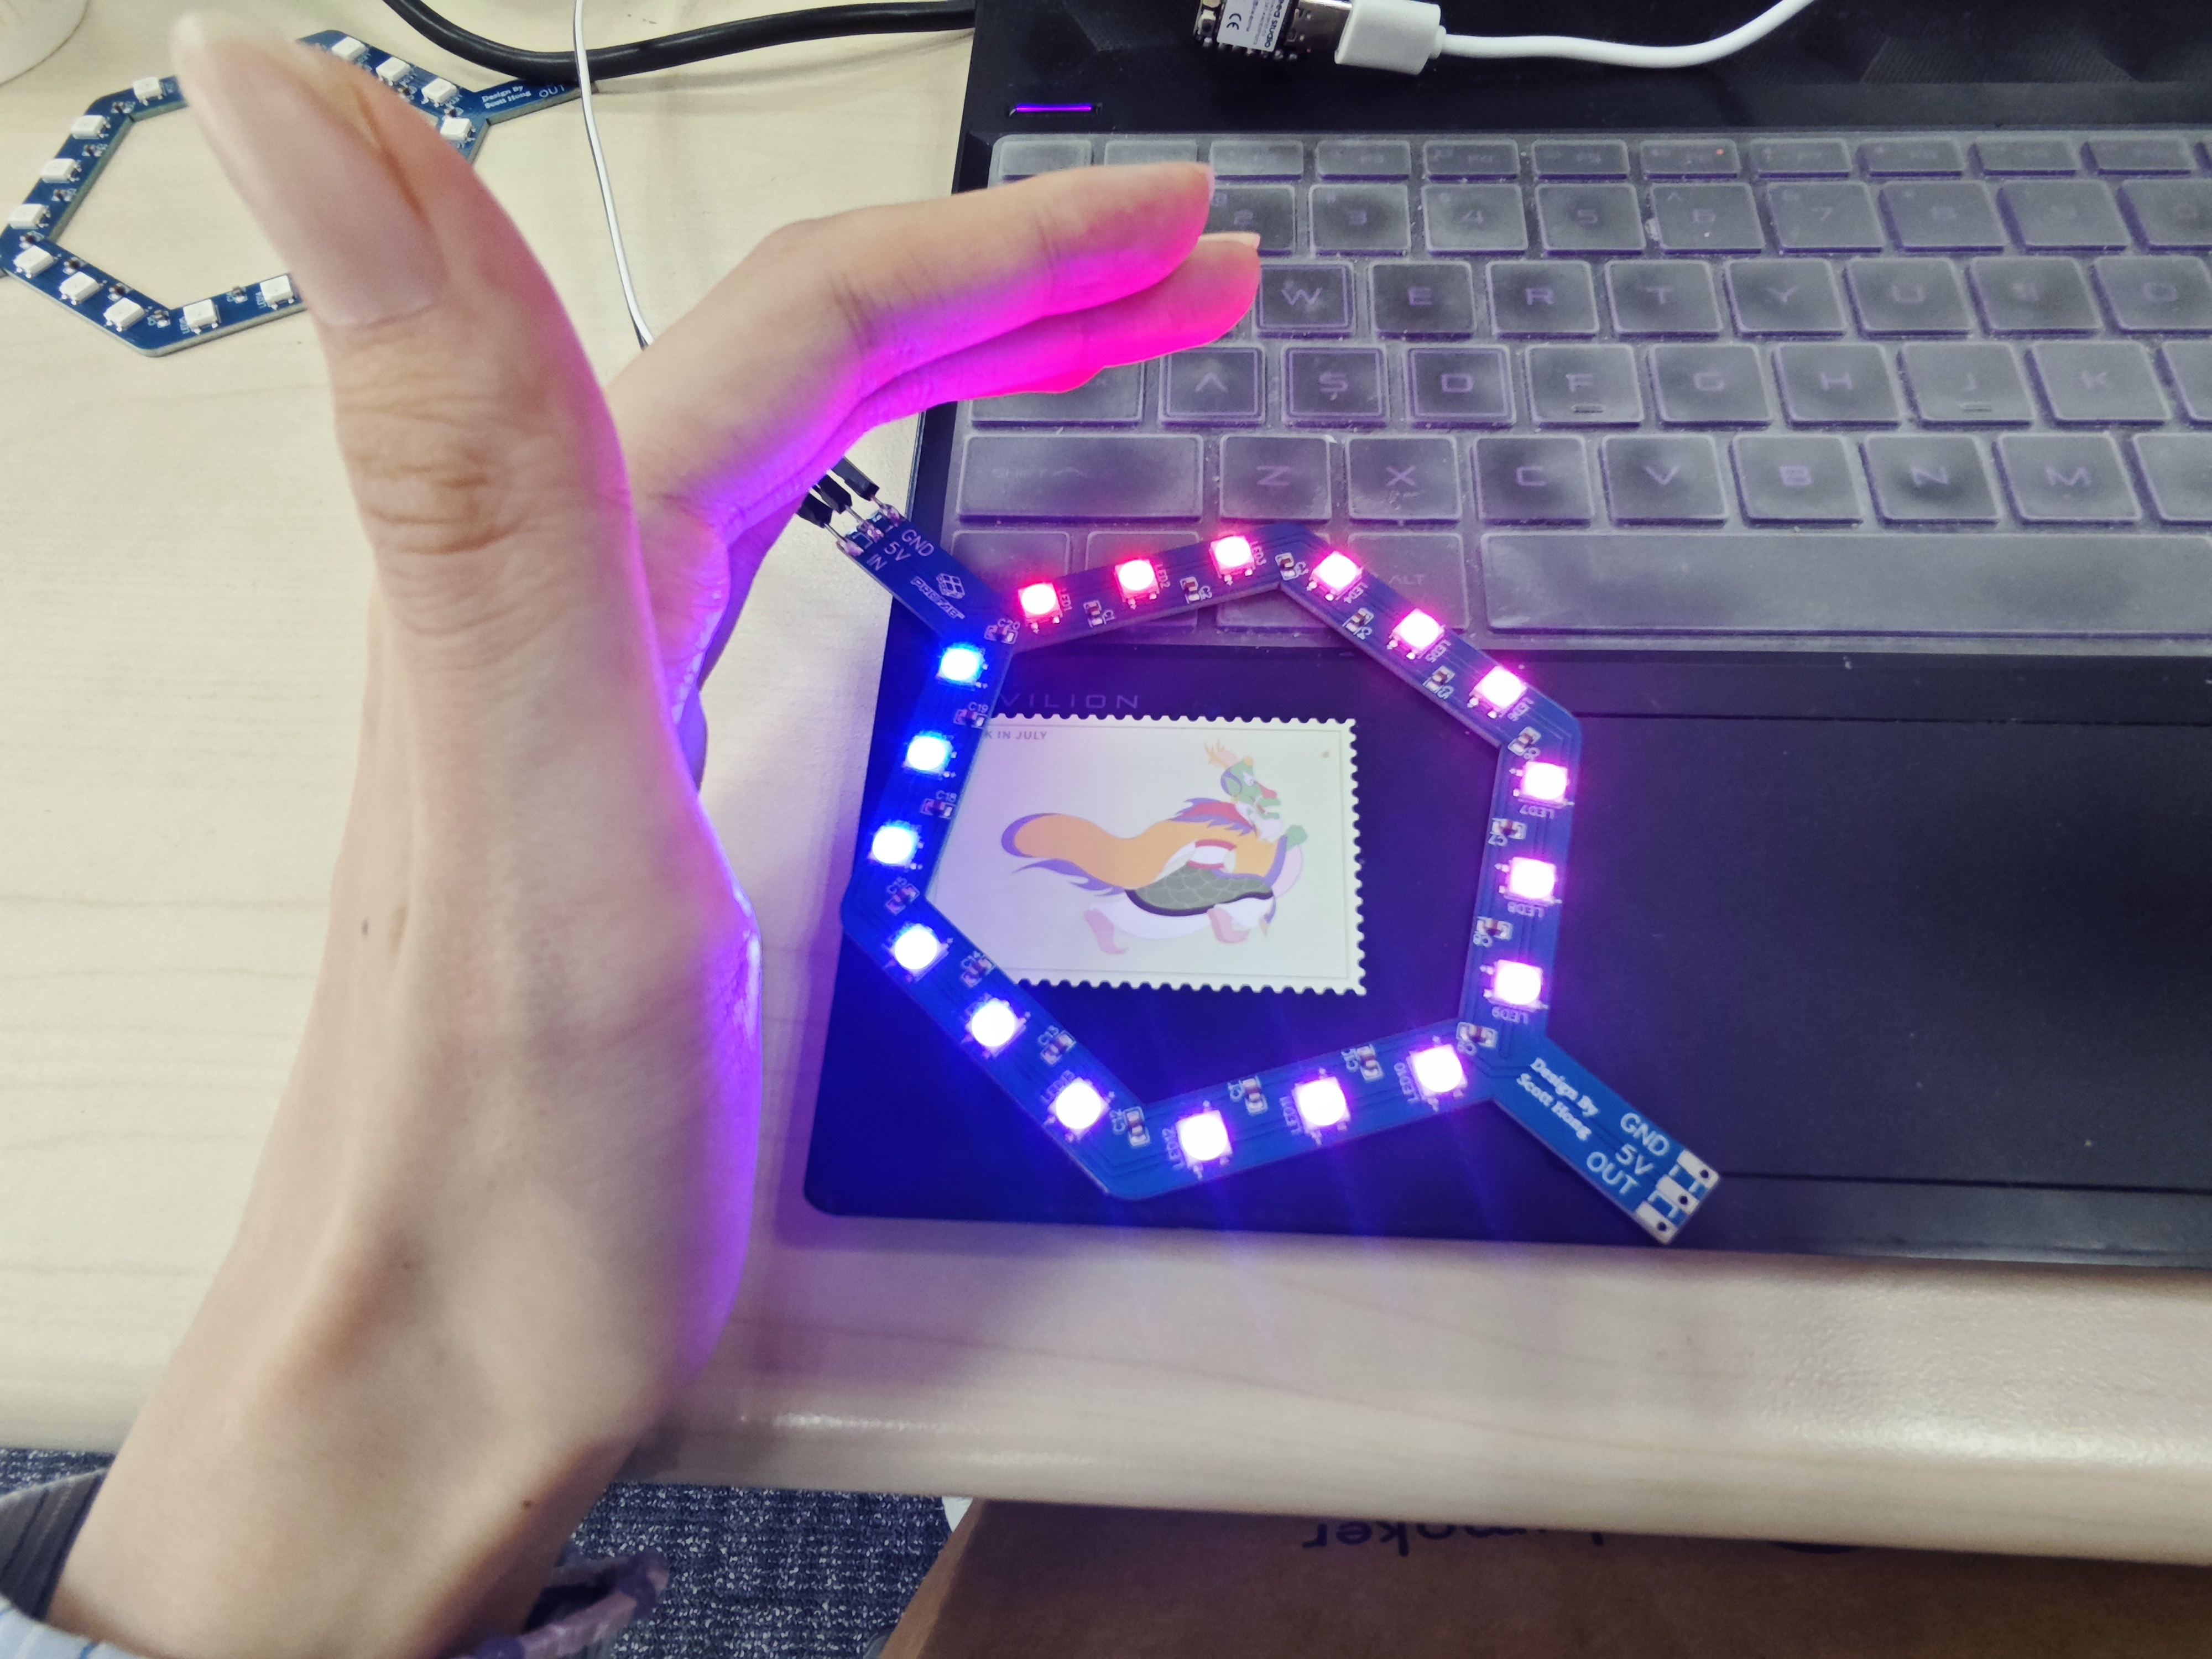
(4) Flowing light
3. LED ardunio and processing
Ardunio code:
bash
#include <FastLED.h>

#define LED_PIN     8    // 信号引脚
#define NUM_LEDS    18   // LED灯数量
#define BRIGHTNESS  128  // 灯带亮度

CRGB leds[NUM_LEDS];

int command = 0;         // 存储Processing指令

void setup() {
  FastLED.addLeds<WS2812, LED_PIN, GRB>(leds, NUM_LEDS);  // 初始化灯带
  FastLED.setBrightness(BRIGHTNESS);                      // 设置亮度
  FastLED.clear();
  FastLED.show();
  Serial.begin(9600);
}

void loop() {
  if (Serial.available()) {
    command = Serial.read();  // 获取从 Processing 发送的指令
    setColor(command);        // 根据指令设置灯带颜色
  }
}

void setColor(int cmd) {
  switch (cmd) {
    case '1':  // 红色
      fill_solid(leds, 30, CRGB::Green);
      FastLED.show();
      break;
    case '2':  // 渐变彩虹色
      fill_rainbow(leds, 30, 15, 15);
      FastLED.show();
      break;
    case '3':  // 通过颜色调色板生成渐变色
      fill_gradient_RGB(leds, 0, CRGB::Gold, 29, CRGB::AliceBlue);
      FastLED.show();
      break;
    case '4':  // 使用OceanColors_p色板
      fill_palette (leds, 30, 0, 8, OceanColors_p, 255, LINEARBLEND);
      FastLED.show();
       break;
    default:
      break;
  }
}
processing code:
bash
import processing.serial.*;
// 串口通信
Serial myPort;
void setup() {
size(400, 200);
// 替换为实际的串口端口名称
myPort = new Serial(this, "COM5", 9600);
if (myPort == null) {
println("Failed to open serial port. Check the port name and connection.");
} else {
println("Serial port opened successfully.");
}
}
void draw() {
background(0);
fill(255);
textSize(20);
textAlign(CENTER, CENTER);
text("Press '1'\nPress '2'\nPress '3'\nPress '4'", width / 2, height / 2);
}
void keyPressed() {
if (key == 'a' ) {
println("blue");
myPort.write('1'); // 发送指令 '1' 给 Arduino
} else if (key == 'b' ) {
println("red");
myPort.write('2'); // 发送指令 '2' 给 Arduino
} else if (key == 'c' ) {
myPort.write('3'); // 发送指令 '3' 给 Arduino
} else if (key == '4' ) {
myPort.write('4'); // 发送指令 '4' 给 Arduino
}
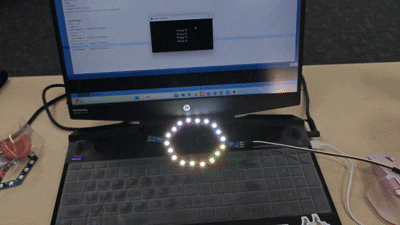
}The efect of the case is shoen below:
4. LED respiration effect and Processing Control
I want to set the LED to show the breath effect. Cotrol the LED with Processing, which shows the breath for firt mouse click, and turn off for second mouse click.
This is the Ardunio code:
bash
#include <FastLED.h>

#define LED_PIN     8    // 信号引脚
#define NUM_LEDS    18   // LED灯数量
#define BRIGHTNESS  128  // 灯带亮度

CRGB leds[NUM_LEDS];

int currentCommand = 0; // 当前指令状态
bool isBreathing = false; // 是否处于呼吸灯状态
bool isFadingOut = false; // 是否处于渐变熄灭状态
unsigned long lastUpdateTime = 0; // 上一次更新时间
int breathInterval = 20; // 呼吸间隔(毫秒)
int fadeInterval = 20; // 渐变间隔(毫秒)
int breathBrightness = 0; // 当前呼吸灯的亮度
int breathDirection = 1; // 呼吸方向(1为增加,-1为减少)

void setup() {
  FastLED.addLeds<WS2812, LED_PIN, GRB>(leds, NUM_LEDS);  // 初始化灯带
  FastLED.setBrightness(BRIGHTNESS);                      // 设置亮度
  FastLED.clear();
  FastLED.show();
  Serial.begin(9600);
}

void loop() {
  if (Serial.available()) {
    int incomingCommand = Serial.read();  // 获取从 Processing 发送的指令
    if (incomingCommand >= '1' && incomingCommand <= '3') {
      // 如果接收到新的指令,切换为呼吸灯效果
      currentCommand = incomingCommand;
      isBreathing = true;
      isFadingOut = false;
      breathBrightness = 0; // 重置亮度
      breathDirection = 1; // 重置方向
    } else if (incomingCommand == '0') {
      // 如果接收到 '0',切换为渐变熄灭
      isBreathing = false;
      isFadingOut = true;
    }
    setColor(currentCommand); // 根据当前指令设置灯带颜色
  }

  // 如果处于呼吸灯状态,控制呼吸效果
  if (isBreathing) {
    unsigned long currentTime = millis();
    if (currentTime - lastUpdateTime > breathInterval) {
      lastUpdateTime = currentTime;
      breathBrightness += breathDirection * 5; // 每次调整亮度
      if (breathBrightness >= BRIGHTNESS) {
        breathBrightness = BRIGHTNESS;
        breathDirection = -1; // 改变方向
      } else if (breathBrightness <= 0) {
        breathBrightness = 0;
        breathDirection = 1; // 改变方向
      }
      FastLED.setBrightness(breathBrightness); // 设置亮度
      FastLED.show();
    }
  }

  // 如果处于渐变熄灭状态,控制渐变
  if (isFadingOut) {
    unsigned long currentTime = millis();
    if (currentTime - lastUpdateTime > fadeInterval) {
      lastUpdateTime = currentTime;
      fadeOut(); // 渐变熄灭
    }
  }
}

void setColor(int cmd) {
  switch (cmd) {
    case '1':  // 红色
      fill_solid(leds, NUM_LEDS, CRGB::Red);
      break;
    case '2':  // 渐变彩虹色
      fill_rainbow(leds, NUM_LEDS, 15, 15);
      break;
    case '3':  // 通过颜色调色板生成渐变色
      fill_gradient_RGB(leds, 0, CRGB::Gold, NUM_LEDS - 1, CRGB::AliceBlue);
      break;
    default:
      FastLED.clear();
      break;
  }
  FastLED.show();
}

void fadeOut() {
  for (int i = 0; i < NUM_LEDS; i++) {
    leds[i] = leds[i] / 2; // 每次将亮度减半
  }
  FastLED.show();
  if (leds[0].r == 0 && leds[0].g == 0 && leds[0].b == 0) {
    isFadingOut = false; // 如果完全熄灭,停止渐变
  }
}
This is the Processing code:
bash
import processing.serial.*;

Serial myPort;

// 按钮状态
boolean fdmState = false;
boolean slaState = false;
boolean mjfState = false;

void setup() {
  size(400, 300);
  // 替换为实际的串口端口名称
  myPort = new Serial(this, "COM5", 9600);
  if (myPort == null) {
    println("Failed to open serial port. Check the port name and connection.");
  } else {
    println("Serial port opened successfully.");
  }

  // 设置文本字体为粗体
  textFont(createFont("Arial-Bold", 16)); // 使用 Arial 粗体字体,大小为 16
}

void draw() {
  background(0);

  // 绘制按钮
  fill(0, 0, 255); // 蓝色
  rect(50, 50, 100, 50);
  fill(255);
  textAlign(CENTER, CENTER); // 文本居中
  text("FDM", 100, 75); // 文本位置调整为按钮中心

  fill(255, 0, 0); // 红色
  rect(170, 50, 100, 50);
  fill(255);
  textAlign(CENTER, CENTER); // 文本居中
  text("SLA", 220, 75); // 文本位置调整为按钮中心

  fill(0, 255, 0); // 绿色
  rect(290, 50, 100, 50);
  fill(255);
  textAlign(CENTER, CENTER); // 文本居中
  text("MJF", 340, 75); // 文本位置调整为按钮中心
}

void mousePressed() {
  // 检测鼠标点击位置
  if (mouseX >= 50 && mouseX <= 150 && mouseY >= 50 && mouseY <= 100) {
    fdmState = !fdmState; // 切换 FDM 按钮状态
    if (fdmState) {
      sendCommand('1'); // 发送呼吸灯指令
    } else {
      sendCommand('0'); // 发送渐变熄灭指令
    }
  } else if (mouseX >= 170 && mouseX <= 270 && mouseY >= 50 && mouseY <= 100) {
    slaState = !slaState; // 切换 SLA 按钮状态
    if (slaState) {
      sendCommand('2'); // 发送呼吸灯指令
    } else {
      sendCommand('0'); // 发送渐变熄灭指令
    }
  } else if (mouseX >= 290 && mouseX <= 390 && mouseY >= 50 && mouseY <= 100) {
    mjfState = !mjfState; // 切换 MJF 按钮状态
    if (mjfState) {
      sendCommand('3'); // 发送呼吸灯指令
    } else {
      sendCommand('0'); // 发送渐变熄灭指令
    }
  }
}

void sendCommand(char cmd) {
  myPort.write(cmd); // 发送指令
}
The effect of the code is shown below: