Proccessing
How Processing Works
Processing is an open source program built on java language. One way to look at it is programming through visual arts. Programs created in processing are called sketches. Conceived of two parts. Setup() and draw(), similar to arduino the Setup() part runs once which you use to define the background, canvas size etc. While draw() constantly run in loops allowing for real time animation or interactions.
Usually you would see processing being used in p5.js which is web based projects where coloful interactions can be made to make website look cool.
Some Processing Examples
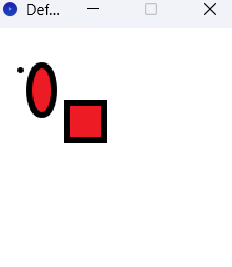
As mentioned earlier processing is working around a white canvas to draw. Everything you do on it is determined by shape and lines. For example following code below shows in setup we created a 200 x 200 pixel canvas. Everything in draw would need to be in this area to be shown. In draw the first line background determines the color, in this case rgb of 255 means background results in white. Fill determines what color are inside the shape which we created two one oval which is determined with ellipse and a rectangle which is determined with rect. Strokeweight values how thick the border lines are, it also would effect the point created below it. Result of this code when runned is shown below the code.
void setup() {
size(200,200);

}

void draw()
{
  background(255,255,255); //Setting the background to white
  fill(237,28,36); //Setting the interior of a shape (fill)
  stroke(0,0,0); // Setting the outline (stroke) to black
  strokeWeight(5); //the define of bold
  point(23,34); //just the color of fill
  ellipse(40,50,20,40);  // center x,center y, widtd,heigh
  rect(60,60,30,30);   //x and y is the coordinate of the rectangle. w and h is rectangle's width and height.
}
Processing and Arduino
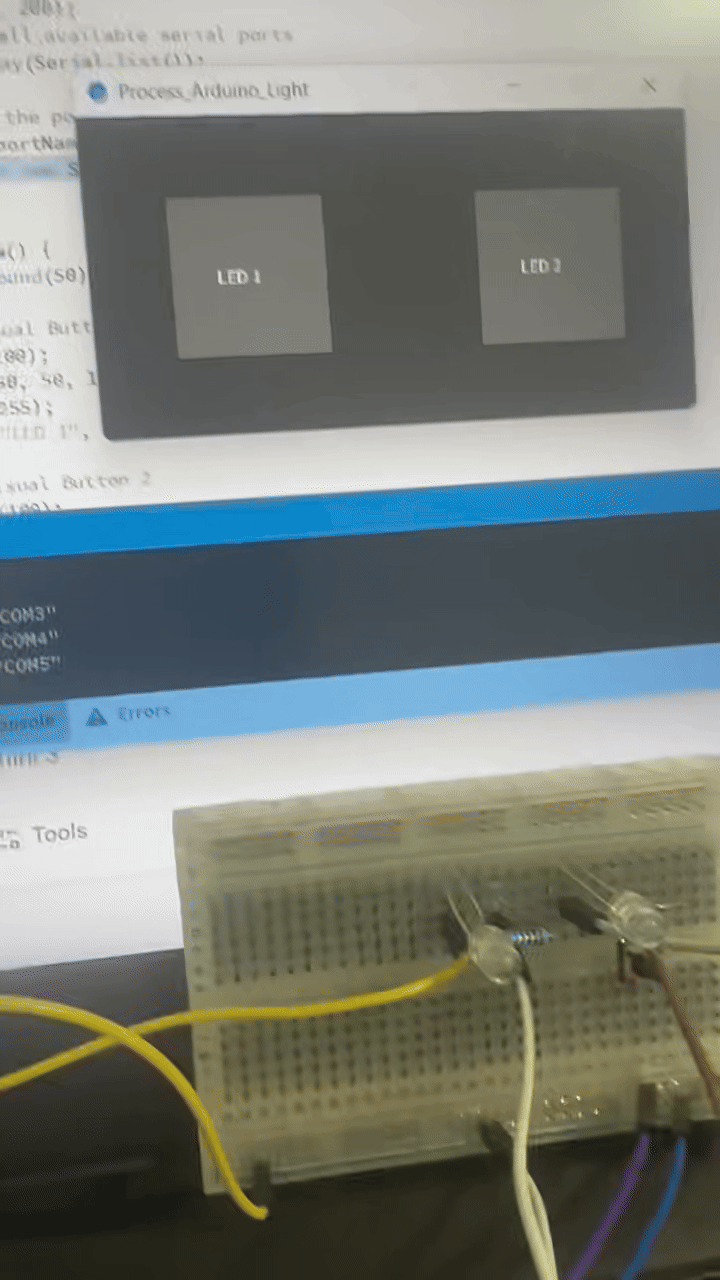
One of the benefits of processing is its capablity with linking with Arduino. For example to control LED lights on an Arduino we can have a button on processing and when mouse clicked have the LED lights shine. Or have Arduino control processing, for example using switches to control the graphics of processing. This is through Serial Communication. Essentially Arduino sends data over to USB cable and processing listen to the port to receive data or the other way around.
Below are codes I've written to test out the connection between Processing and Arduino
First part is codes for Processing. First part is to import processing serial. This is so we can have connection between Processing and Arduino. Then we set the size of our canvas to 400,200. "printArray(Serial.list());" is important because in order for processing to know which USB port is being used with Arduino we need to determine which one is being used. Once we've determined which com[] we are using we can change the digit in String portname to the one we are using. As shown the USB I was using is Com5 which is under port 2, thus I changed the digit in the bracket from 0 -> 2.  The New Serial of 9600 should always match the Arduino side so they have the same signal. In this case I've set both to 9600. Next we created two buttons from LED lights, both are rectangle shape with LED text in the center. The following two functions mousePressed and mouseReleased uses the x and y location of our mouse to determine if we have clicked on the area of the box that turns the LED light on or off. When light A is clicked then processing sends a signal A to Arduino and when light B is clicked then processing send signal B to Arduino. This will be explained in the Arduino coding section.
import processing.serial.*;

Serial myPort;

void setup() {
  size(400, 200);
  // List all available serial ports
  printArray(Serial.list());

  // Open the port your Arduino is connected to
  String portName = Serial.list()[2];
  myPort = new Serial(this, portName, 9600);
}

void draw() {
  background(50);

  // Visual Button 1
  fill(100);
  rect(50, 50, 100, 100);
  fill(255);
  text("LED 1", 80, 105);

  // Visual Button 2
  fill(100);
  rect(250, 50, 100, 100);
  fill(255);
  text("LED 2", 280, 105);
}

void mousePressed() {
  // Check if Mouse is over Button 1
  if (mouseX > 50 && mouseX < 150 && mouseY > 50 && mouseY < 150) {
    myPort.write('A'); // Send 'A' to turn ON LED 1
  }
  // Check if Mouse is over Button 2
  if (mouseX > 250 && mouseX < 350 && mouseY > 50 && mouseY < 150) {
    myPort.write('B'); // Send 'B' to turn ON LED 2
  }
}

void mouseReleased() {
  myPort.write('a'); // Send 'a' to turn OFF LED 1
  myPort.write('b'); // Send 'b' to turn OFF LED 2
}
\
Below is the code for the Arduno side. After setting our pin for our LED into 12 and 13. We setup for both pin for output. Then we check which command we are receiving from Serial. This is the signal A and B mentioned earlier in processing. By doing an if check on the char being read we can choose wheter the LED light is being turned on or off.
const int led1Pin = 12;
const int led2Pin = 13;

void setup() {
  Serial.begin(9600); // Must match Processing's baud rate
  pinMode(led1Pin, OUTPUT);
  pinMode(led2Pin, OUTPUT);
}

void loop() {
  if (Serial.available() > 0) {
    char command = Serial.read();

    if (command == 'A') digitalWrite(led1Pin, HIGH);
    if (command == 'a') digitalWrite(led1Pin, LOW);
    if (command == 'B') digitalWrite(led2Pin, HIGH);
    if (command == 'b') digitalWrite(led2Pin, LOW);
  }
}
Here is a GIF of the lights sychronizing to the Processing command. As described when the 1st button is clicked one of the LED turns on, when the mouse release the light turns off and same for the other light.